The Sphinx and Roxygen2 documentation generators
A documentation generator is a tool that creates software documentation intended for programmers (API documentation), end-users (end-user guide) or both. The documentation is generated from a set of source code files.
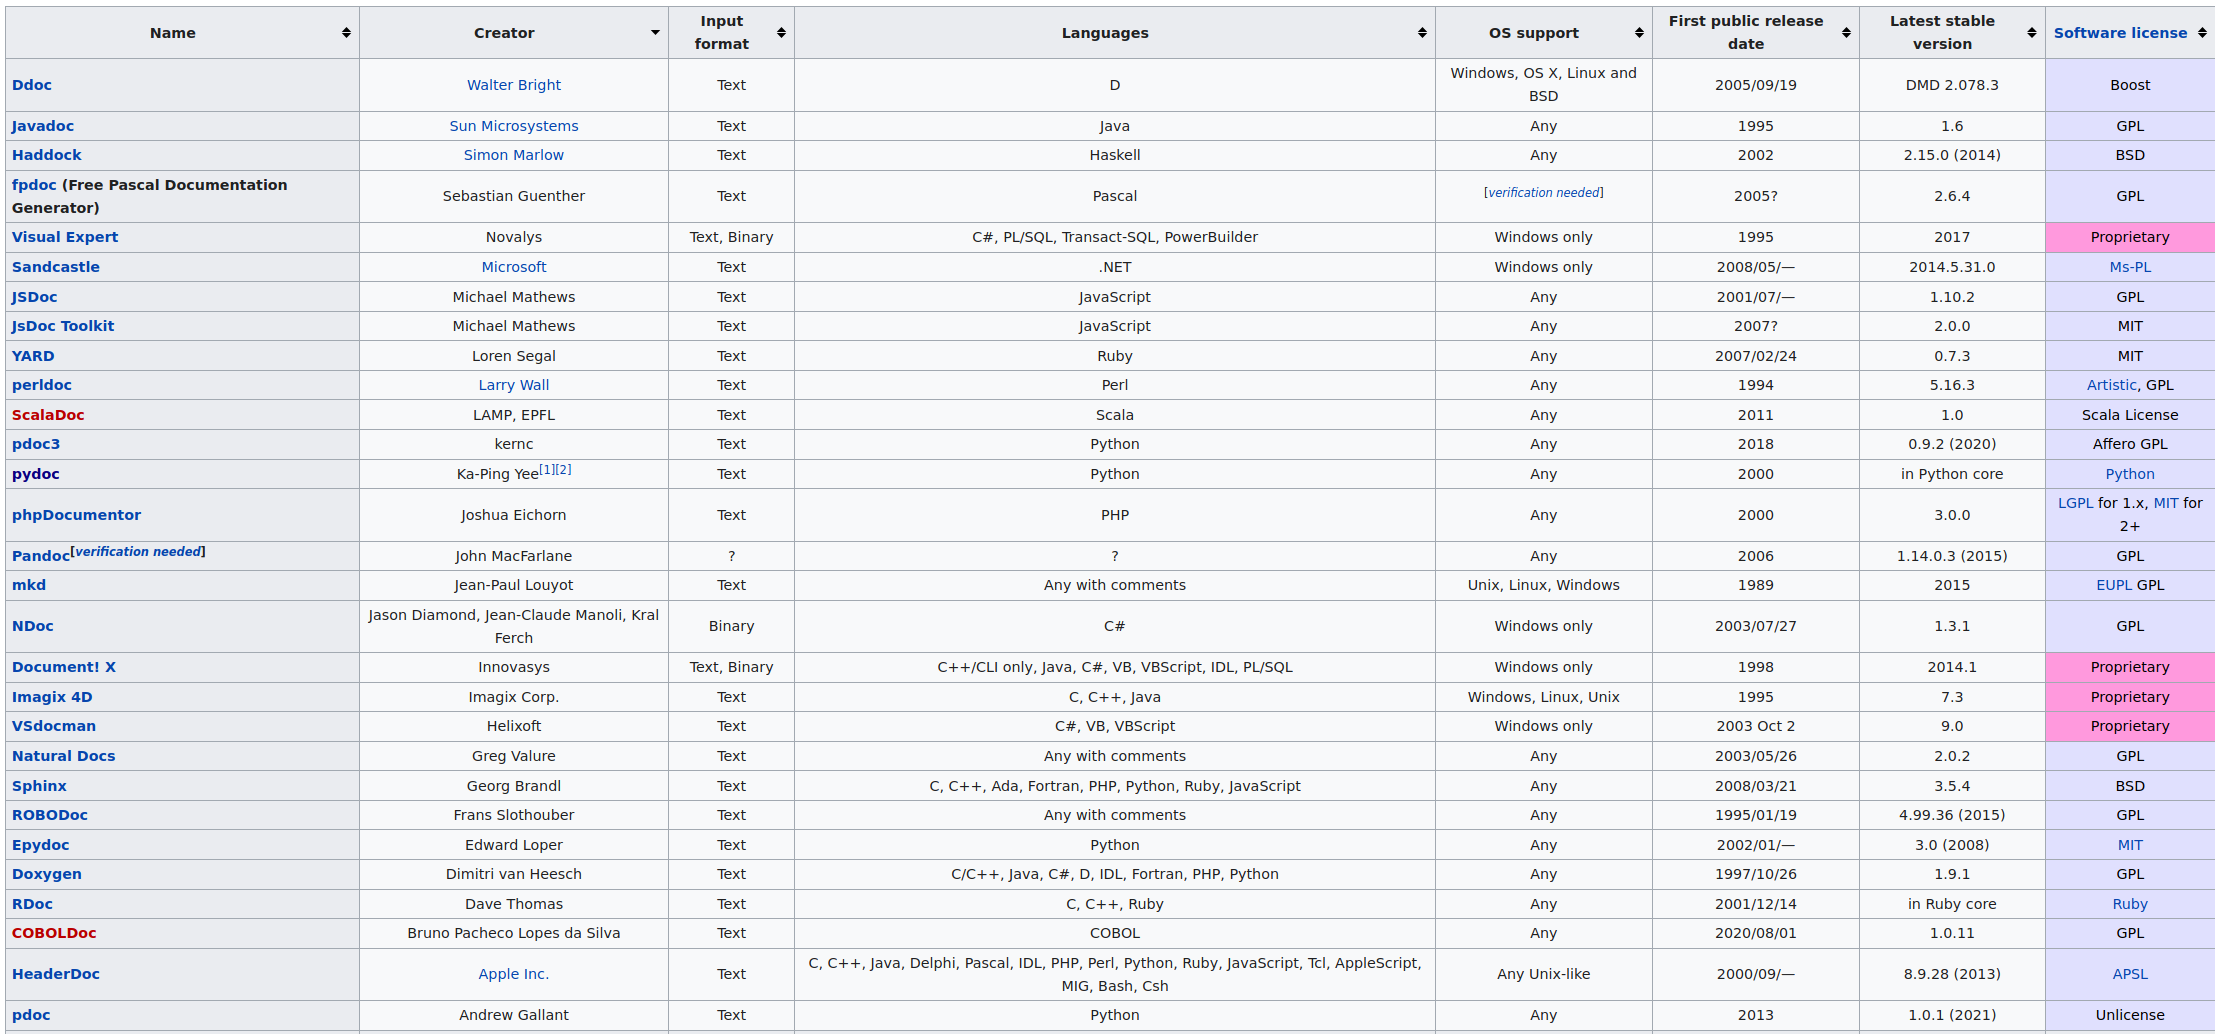
Let’s focus on two documentation generators:
- Sphinx to generate a documentation for tools written in Python (or other languages)
- Roxygen2 to generate a documentation for tools written in R
Sphinx
Sphinx is a tool that makes beautiful api documentation or/and end-user guide.
With Sphinx, you can produce documentation in various format: * HTML * LaTeX * ePub * Plain text * etc…
With Sphinx, you can easily define a hierarchical structure for your documentation with automatic links to siblings, parents or children in your document tree.
It has many extensions:
- Automatic testing of code snippets
- Inclusion of docstrings from Python modules
- Render math via javascript or as image
- And more…
Sphinx uses reStructuredText (.rst extention) as its markup language. Sphinx can also generate documentation from markdown files.
Installation of Sphinx
Sphinx is written in Python and supports Python >= 3.6. It depends on many third-party libraries that are installed when Sphinx is installed
You can install Sphinx for many operating systems such as Linux, macOS, and Windows. You can also install it from PyPI and docker.
For example, to install Sphinx on Ubuntu you can run:
$ apt-get install python3-sphinxTo install Sphinx on macOS, you can run:
$ brew install sphinx-docTo install Sphinx from PyPI:
$ pip install sphinxFor other installation methods, please visit: https://www.sphinx-doc.org/en/master/usage/installation.html
Building a documentation
The bedtools venn project will be used as an example to build a documentation with Sphinx. It is available at the following address https://gitbio.ens-lyon.fr/nfontrod/bedtools_venn.
The project has this structure:
$ tree .
.
├── data
├── LICENCE
├── README.md
├── results
├── src
│   ├── bedtools_venn.py
│   ├── config.py
│   ├── __init__.py
│   └── __main__.py
└── tests
    ├── files
    │   ├── a.bed
    │   └── b.bed
    ├── __init__.py
    └── test.py
Now let’s build a documentation with the following commands:
$ mkdir doc
$ cd doc
$ sphinx-quickstart . # Creation of the documentation in the current folder
Welcome to the Sphinx 3.5.4 quickstart utility.

Please enter values for the following settings (just press Enter to
accept a default value, if one is given in brackets).

Selected root path: .

You have two options for placing the build directory for Sphinx output.
Either, you use a directory "_build" within the root path, or you separate
"source" and "build" directories within the root path.
> Separate source and build directory (y/n) [n]: y
The project name will occur in several places in the built documentation.
> Project name: bedtools venn
> Author name(s): Nicolas Fontrodona
> Project release []:
If the documents are to be written in a language other than English,
you can select a language here by its language code. Sphinx will then
translate text that it generates into that language.

For a list of supported codes, see
https://www.sphinx-doc.org/en/master/usage/configuration.html#confval-language.
> Project language [en]:
Creating file /media/Data/Projects/2021_05_31_bedtools_venn/doc/source/conf.py.
Creating file /media/Data/Projects/2021_05_31_bedtools_venn/doc/source/index.rst.
Creating file /media/Data/Projects/2021_05_31_bedtools_venn/doc/Makefile.
Creating file /media/Data/Projects/2021_05_31_bedtools_venn/doc/make.bat.

Finished: An initial directory structure has been created.

You should now populate your master file /media/Data/Projects/2021_05_31_bedtools_venn/doc/source/index.rst and create other documentation
source files. Use the Makefile to build the docs, like so:
   make builder
where "builder" is one of the supported builders, e.g. html, latex or linkcheck.
This command has created the following file tree structure (in the doc folder):
$ tree .
.
├── build
├── make.bat
├── Makefile
└── source
    ├── conf.py
    ├── index.rst
    ├── _static
    └── _templates
To build an HTML documentation, you can run the following commands:
$ sphinx-build -b html source build # will build an HTML documentation
$ # Alternative method
$ make html # because there is a Makefile and a make.bat in your current directory
These commands create many files:
$ tree -L 2 build/
build/
├── doctrees
│   ├── environment.pickle
│   └── index.doctree
└── html
    ├── genindex.html
    ├── index.html
    ├── objects.inv
    ├── search.html
    ├── searchindex.js
    ├── _sources
    └── _static
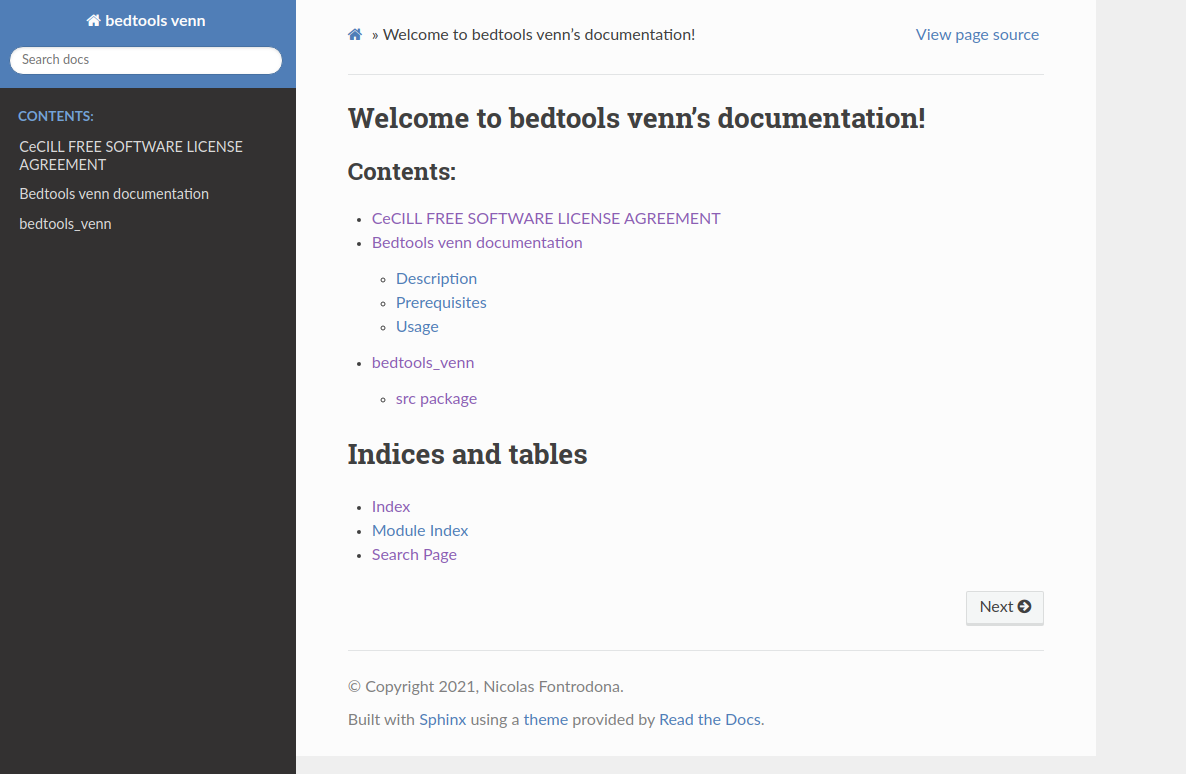
If you try to open the doc/build/html/index.html file generated by Sphinx, you should see the following page:
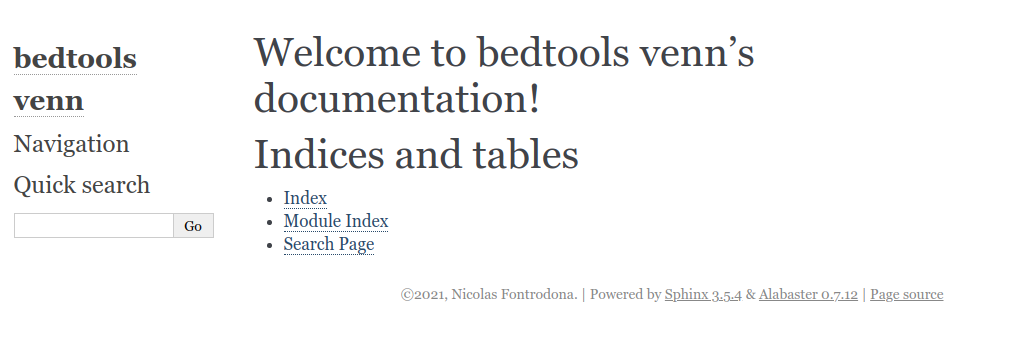
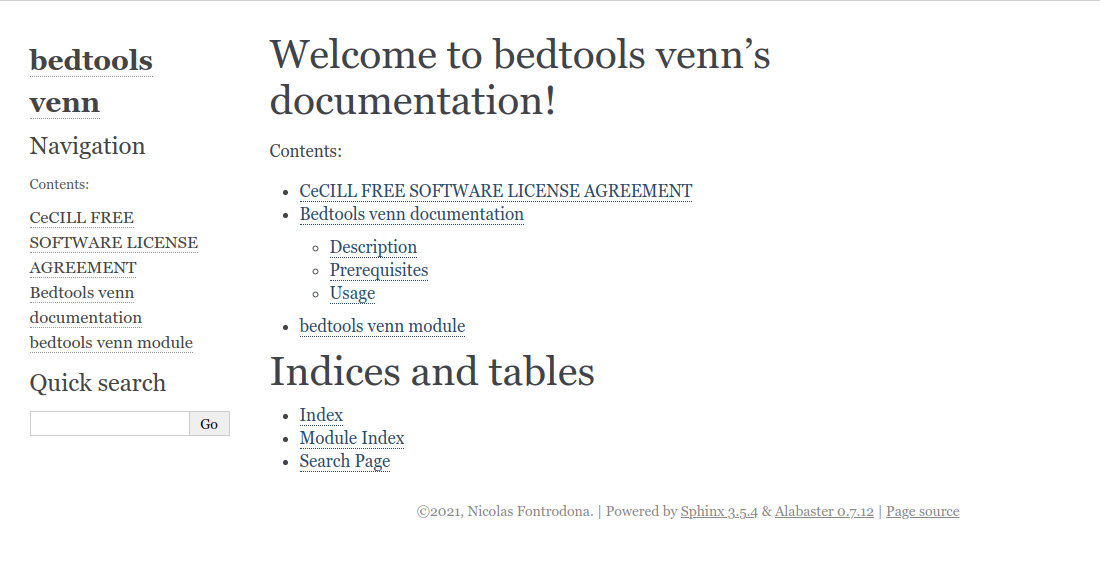
Ok ! we have generated an empty documentation.
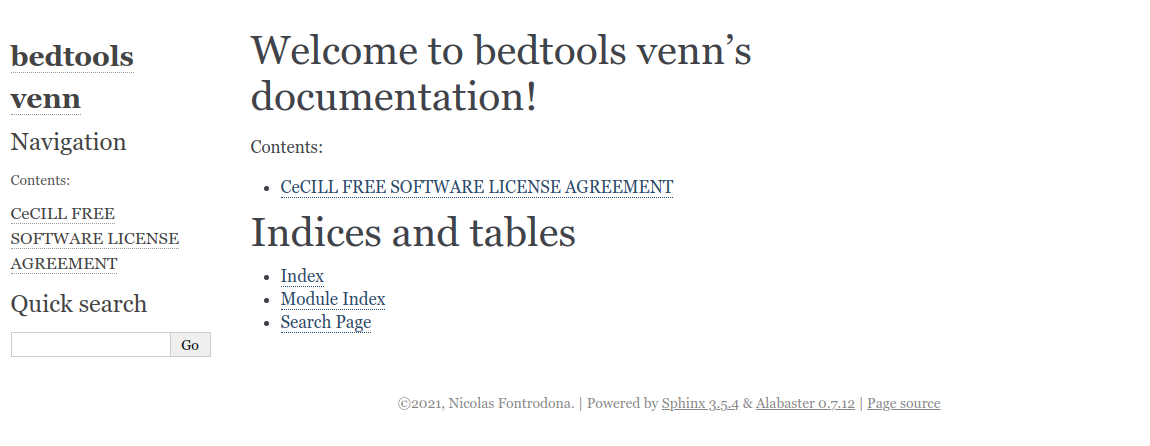
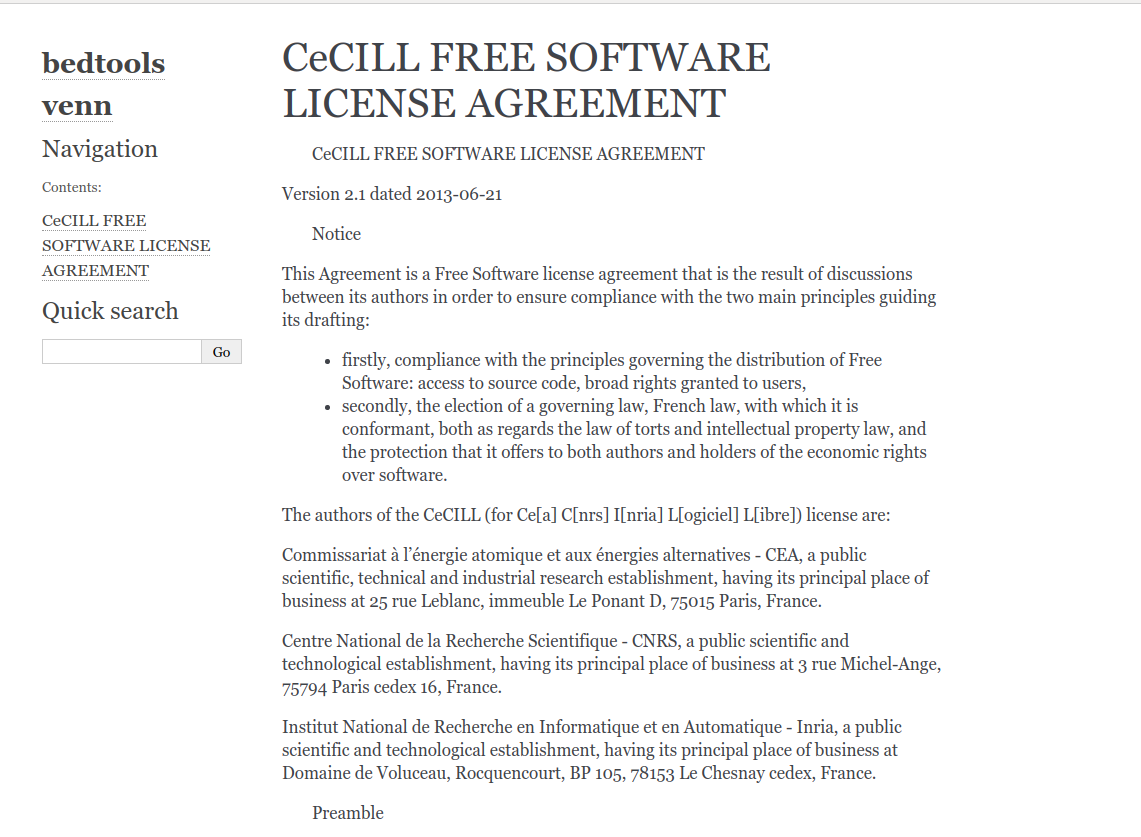
Adding documentation from files in ReStructuredText format (.rst).
Let’s first create a file named doc/source/Licence.rst that contains the licence and displays it in the documentation.
This file contains the following content:
CeCILL FREE SOFTWARE LICENSE AGREEMENT
======================================

.. include:: ../../LICENCE
The first is followed by a line of equal signs. These two lines define a title. For titles the numbers of sign = must be equal to the length of the text title.
The final line is a directive that indicates to include the content of the file ../../LICENCE in the Licence.rst.
You can learn more about ReStructuredText: * syntax here: https://docutils.sourceforge.io/docs/ref/rst/restructuredtext.html * directives here: https://docutils.sourceforge.io/docs/ref/rst/directives.html
Then, we have to update the doc/source/index.rst file to display the Licence.rst in our documentation.
.. bedtools venn documentation master file, created by
   sphinx-quickstart on Tue Jun  1 10:22:32 2021.
   You can adapt this file completely to your liking, but it should at least
   contain the root `toctree` directive.

Welcome to bedtools venn's documentation!
=========================================

.. toctree::
   :maxdepth: 2
   :caption: Contents:

   Licence.rst


Indices and tables
==================

* :ref:`genindex`
* :ref:`modindex`
* :ref:`search`
The directive .. toctree:::
This directive inserts a “TOC tree” (Table Of Content) at the current location, using the individual TOCs (including “sub-TOC trees”) of the documents given in the directive body. Relative document names (not beginning with a slash) are relative to the document the directive occurs in, absolute names are relative to the source directory. A numeric maxdepth option may be given to indicate the depth of the tree; by default, all levels are included.
To learn more about this directive, you can visit: https://www.sphinx-doc.org/en/master/usage/restructuredtext/directives.html#toctree-directive
Then, we can run make html in the doc directory. If we open doc/build/html/index.htmlwe should see this:
Adding documentation from files in Markdown format (.md).
Let’s create a doc/source/documentation.md file very similar to README.md at the root of the directory. (you can see the content of this file here)
Then, let’s add documentation.md in the doc/source/index.rst file like this:
Welcome to bedtools venn's documentation!
=========================================

.. toctree::
   :maxdepth: 2
   :caption: Contents:

   Licence.rst
   documentation.md
Only RestructuredText files are handled by Sphinx by default, so we need to install myst_parser to parse markdown files. You can install this module by running pip install myst-parser.
Then, open doc/source/conf.py and change the extentions list to:
extensions = [
    'myst_parser',
] # Now sphinx uses myst_parser.
Next, we can run make html and see the result by opening doc/build/html/index.html.

generation of API documentation
Sometimes, when we create a documentation, we want to expose the signature, and a description of some functions that can be re-used by another developer.
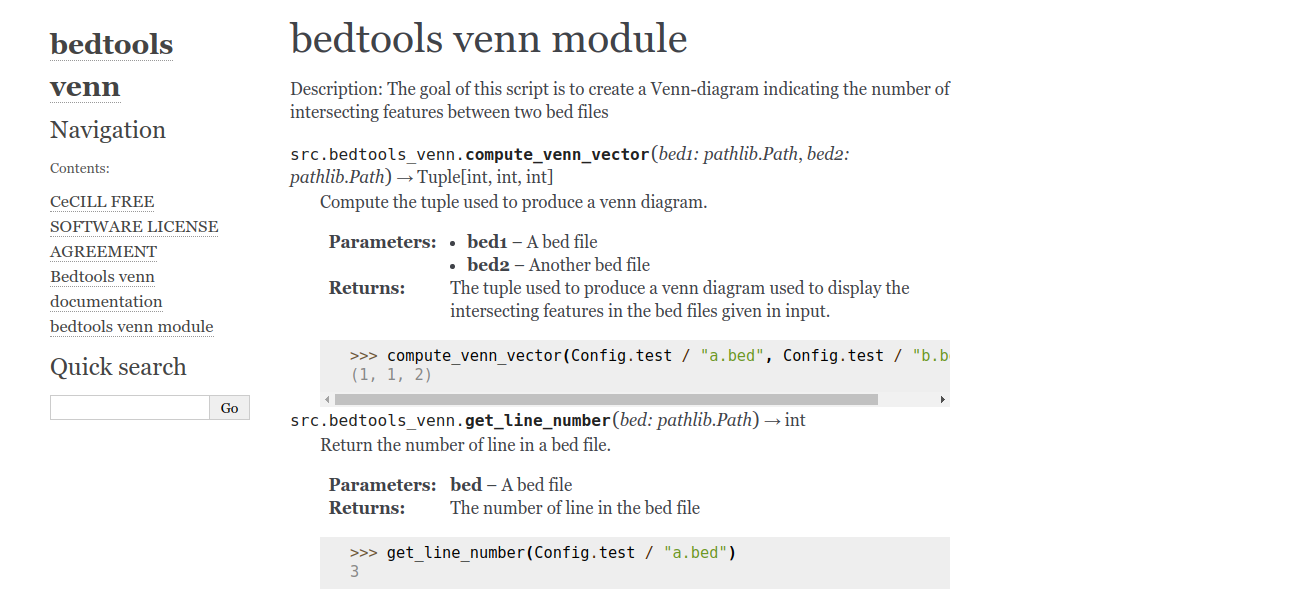
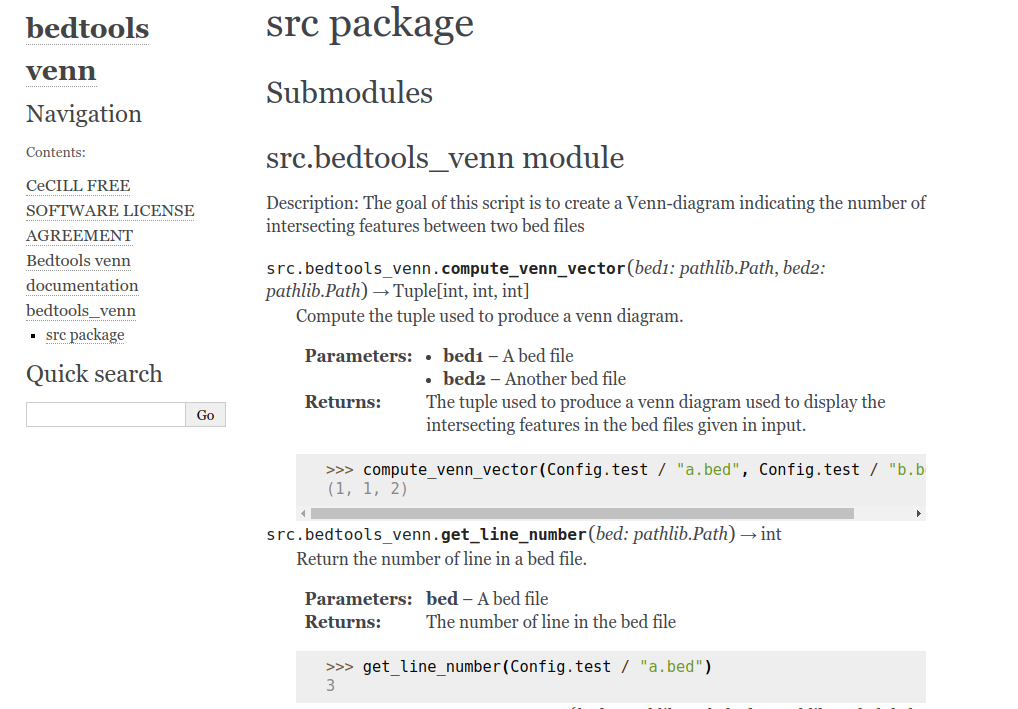
When we write Python code, we can create a docstring under the signature of a function to describe what it does, and it’s parameters. Here is an example from the bedtools venn project:
@lru_cache(maxsize=None)
def get_line_number(bed: Path) -> int:
    """
    Return the number of line in a bed file.

    :param bed: A bed file
    :return: The number of line in the bed file

    >>> get_line_number(Config.test / "a.bed")
    3
    """
    f = bed.open("r")
    val = len(f.read().splitlines())
    f.close()
    return val
With Sphinx, it is possible to automatically recover all function signatures and docstrings written in your code. Sphinx uses the extension autodoc (installed with Sphinx) to do this.
To use autodoc we need to add it in the extentions list in the file doc/source/conf.py
extensions = [
    'sphinx.ext.autodoc',
    'myst_parser',
]
With this, we can include the docstring of a module and the doctrings of every function/class inside every Python module/submodule at a particular location.
For example, we can create a file named doc/source/module.rst containing this:
bedtools venn module
-------------------------

.. automodule:: src.bedtools_venn
   :members:
The directive automodule from autodoc allows to document a module, class or exception. All three directives will by default only insert the docstring of the object itself.
:members: is used to parse all classes, functions or exceptions inside the module src.bedtools_venn (corresponding to src/bedtools_venn.py file).
Then, we add module.rst in the index.rst file:
Welcome to bedtools venn's documentation!
=========================================

.. toctree::
   :maxdepth: 2
   :caption: Contents:

   Licence.rst
   documentation.md
   module.rst
Finally, in order for autodoc to be able to find the module described in module.rst, we need to edit the doc/source/conf.py file by adding these lines at the beginning:
import os
import sys
sys.path.insert(0, os.path.abspath('../../')) # We add our module to the path of `conf.py`.
We can now build the documentation with make html:
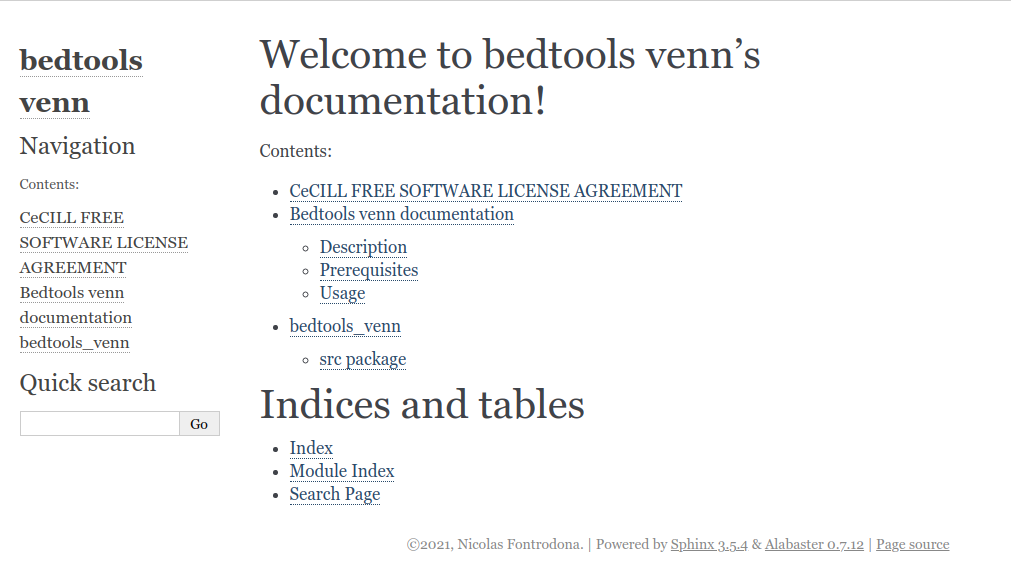
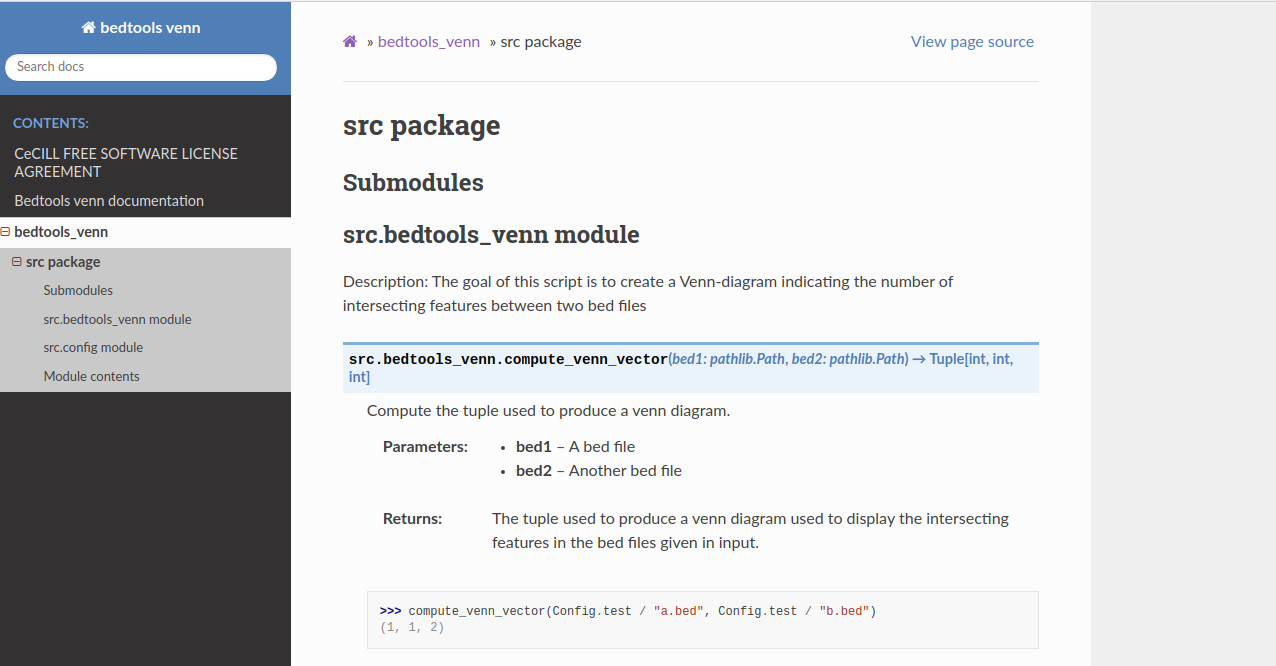
Having to write an automodule directive for every file in a big project can be time-consuming and boring. That’s why the sphinx-apidoc tool exists !
To use it, just run:
$ rm source/module.rst # removes the module created earlier
$ # sphinx-apidoc -o OUPUT_DIR MODULE_DIR
$ sphinx-apidoc -H bedtools_venn -o source/ ../src/
Creating file source/src.rst.
creating file source/modules.rst.
Let’s look at the files created by sphinx-apidoc:
Extract from src.rst:
src package
===========

Submodules
----------

src.bedtools\_venn module
-------------------------

.. automodule:: src.bedtools_venn
   :members:
   :undoc-members:
   :show-inheritance:

src.config module
-----------------
...
modules.rst file
bedtools_venn
=============

.. toctree::
   :maxdepth: 4

   src
Then, we can include modules.rst into index.rst and run make html.
Of course having a module named src is not very informative. To have a better name you can simply move every file in src into src/package_name and then edit the doc/source/conf.py and add sys.path.insert(0, os.path.abspath('../../src/'))
Note: sphinx-apidoc only includes public features (features not beginning with an underscore).
Changing the appearance of the documentation
It’s possible to change the appearance of your html documentation very easily.
Many themes are available. You can choose one here: https://sphinx-themes.org/.
For example, let’s change the theme of our documentation to use the sphinx-rtd-theme. First we need to download the theme:
$ pip install sphinx-rtd-themeThen, we must edit the doc/source/conf.py file:
extensions = [
    'sphinx_rtd_theme',
    'sphinx.ext.autodoc',
    'myst_parser',
]
# -- snip --
html_theme = 'sphinx_rtd_theme' # line to change
Then, we can run make html to see the result:
Build a documentation in pdf format
$ make latex
$ cd build/latex
$ sudo apt-get install latexmk # optional if you don't have latexmk
$ make all-pdf
If you are interested to see how to build a documentation in another format, you can check the documentation.
Introduction to Roxygen2
R provides a standard way of documenting packages: you write .Rd files in the man/ directory. These files have a custom syntax.
Roxygen2 allows to automatically generate those .Rd files while providing other advantages: * Code and documentation are adjacent. So when you modify your code, it’s easy to remember that you need to update the documentation. * Roxygen2 dynamically inspects the objects it documents, so it can automatically add data that you’d otherwise have to write by hand.
As well as generating .Rd files, Roxygen2 will also create a NAMESPACE file for you. This file is used to make an object publicly available outside your package and controls which functions from other packages are made available for your package.
Installation
> install.packages("roxygen2")
# Or the development version from GitHub:
> install.packages("devtools")
> devtools::install_github("r-lib/roxygen2")
Documentation Blocks
A roxygen block is a sequence of line starting with #'. Those blocks are located before the definition of R objects. They are used to generate the documentation. A block can be organized by the use of tags. A tag must begin by an @.
Here is an example from the lazymodel small project.
#' Build the model, and analyse it
#'
#' This function will build the model, run a diagnostic and save
#' it to diagnostic.png. Then it will save the summary of
#' the model inside a summary.txt file
#'
#' @param formula A string corresponding to the formula of the model.
#' @param family A string indicating the distribution of the model chosen
#' @param data A dataframe containing the responce and explanatory variables
#' @param output A folder where the diagnostic figure will be created
#'
#' @export
make_analysis <- function(formula, family, data, output) {
    mod <- build_model(formula, family, data)
    run_diagnostics(mod, output)
    write_summary(mod, output)
}- The first sentence is the
title. It is shown at the top of each help file. It should generally fit one line. - The second paragraph corresponds to the description of the function. It should briefly describe what the function does.
- The third paragraph describes all the parameters of the function
make_analysis. Each line begins with the tag@paramfollowed by the name of a parameter and its description. This tag is specific for function objects @exportline tells Roxygen2 to add this function to theNAMESPACEfile so that it can be accessible to users using your package.
Notes: * The first and second paragraph can be preceded by the tags @title and @description respectively. * You can document multiple arguments in one place by separating their names with commas (no spaces). For example: @param x,y Numeric vectors.
Some other very useful paragraphs can be used in documentation. Let’s look at this example taken from Roxygen2 documentation.
#' Sum of vector elements.
#'
#' @description
#' `sum` returns the sum of all the values present in its arguments.
#'
#' @details
#' This is a generic function: methods can be defined for it directly
#' or via the [Summary()] group generic. For this to work properly,
#' the arguments `...` should be unnamed, and dispatch is on the
#' first argument.
#'
#' @param ... Numeric, complex, or logical vectors.
#' @param na.rm A logical scalar. Should missing values (including `NaN`)
#'   be removed?
#' @return If all inputs are integer and logical, then the output
#'   will be an integer.
#'
#' @examples
#' sum(1:10)
#' sum(1:5, 6:10)
#' sum(F, F, F, T, T)
#'
sum <- function(..., na.rm = TRUE) {}
We can see three new tags: * @details : This tag is followed by a paragraph that explains, in detail, how the function works. * @return : This tag describes the return type of the function * @examples : This tag is used to give examples of how to use the function
If a function needs to use an object defined in another package the tag @import can be used. Example: to import a package named package_name we can type @import package_name.
It is also possible to document a package itself by documenting a special sentinel "_PACKAGE". The package documentation should be placed in a file name {pkgname}-package.R and have @keywords internal. Here’s an example taken from lazymodel:
File R/lazymodel-package.R.
#' @details
#' The only two functions you're likely to need from lazymodel are
#' * [make_analysis()]. This function allow you to very easily build a model and check if it is appropriate for your data
#' * [cli_analysis()]. This function does the same thing than [make_analysis()] but also allows to build a CLI to make analysis without writing any R code.
#'
#' Otherwise refer to the vignettes to see how to format the documentation.
#' @keywords internal
"_PACKAGE"
It is also possible to: * document datasets, R6 classes and S4 classes * Add arbitrary sections to break long details section with the keyword @section. * Cross-link documentation files with @seealso and @family. * inherit documentation from other functions with @inherit * And more…
To find out how to do these things, please visit this page
Building a documentation
Let’s try to build the documentation of the lazymodel project.
This project has the following structure:
.
├── data
│   └── student.rdata
├── DESCRIPTION
├── LICENCE
├── R
│   ├── analysis.R
│   ├── dataset.R
│   ├── lazymodel-package.R
│   ├── model.R
│   └── parser.R
└── README.md
The objects in each file in R/ folder are documented using roxygen blocks as described above.
The file(s): * analysis.R, model.R and parser.R contain functions with documentation blocks * lazymodel-package.R contains the documentation for the package itself * dataset.R contains the documentation of a dataset defined in the package.
Before creating the documentation you must create a DESCRIPTION at the root of the project (see lazymodel structure) containing at least the following content:
Package: lazymodel
Version: 1.0.0
You can add additional parameters, for example de DESCRIPTION file of the lazymodel project is the following:
Package: lazymodel
Version: 1.0.0
Title: Statistical modeling package
Licence: "CeCILL"
Authors@R: person("Nicolas", "Fontrodona",
                  email = "nicolas.fontrodona@ens-lyon.fr",
                  role = c("aut", "cre"))
Description: The package provides a set of function to analyse FCS files.
Depends:
  R (>= 3.4.4),
Imports:
  glmmTMB (>= 1.0.1),
  argparser (>= 0.7.1),
  DHARMa (>= 0.2.7),
Encoding: UTF-8
Roxygen: list(markdown = TRUE)
If you want to know all the metadata that you can add to this file, please visit : https://r-pkgs.org/description.html.
To build the documentation go at the root of your project folder and enter:
$ R
> library("roxygen2")
> roxygen2::roxygenise()
First time using roxygen2. Upgrading automatically...
Loading lazymodel
Writing NAMESPACE
Writing NAMESPACE
Writing make_analysis.Rd
Writing cli_analysis.Rd
Writing student.Rd
Writing lazymodel-package.Rd
Writing build_model.Rd
Writing run_diagnostics.Rd
Writing write_summary.Rd
Writing cli_function.Rd
> # other option
> library(devtools)
> devtools::document()
Updating lazymodel documentation
Loading lazymodel
Writing NAMESPACE
Writing NAMESPACE
These commands create a file NAMESPACE (listing the objects to export, and the packages to import) and a folder man/ containing .Rd files. Note that you can mix handwritten .Rd files and roxygen2.
R is then capable of converting .Rd files into human-readable documentation.
> devtools::load_all() # load lazymodel
> ?lazymodel::run_diagnostics # this command will convert Rd file into human readable documentation. same for help(lazymodel::run_diagnostics)
run_diagnostics           package:lazymodel            R Documentation

Run a diagnostic of the model

Description:

     Create figures to see if the model fits the data

Usage:

     run_diagnostics(mod, output)

Arguments:

     mod: A glmmTMB object corresponding to the model of interest

  output: A folder where the diagnostic figure will be created
We can build a manual for lazymodel by just running:
> devtools::build_manual()This will create, in the parent directory of lazymodel, the file lazymodel_1.0.0.pdf which looks like this:

R package with Roxygen2
By using Roxygen2, you create an R package. If you push on gitbio a project that uses Roxygen2 and grant access to the source code to everyone, then everybody is able to download your application as a package using devtools.
For example, you can download lazymodel as a package by typing:
> library(devtools)
> install_gitlab("nfontrod/lazymodel", host = "https://gitbio.ens-lyon.fr", quiet = FALSE)